Traditional Lebanese Hummus Recipe

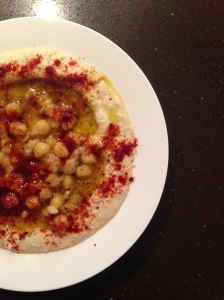
hummus There are so many variations on how to make hummus that I enlisted my mum’s recipe. My mum is THE BEST COOK I have ever come across. As she doesn’t use recipes when cooking, I tried to get as close to real measurements as possible. I have tested this out and it works well. You can cheat by using canned chickpeas… it won’t taste as amazing, but it will be pretty close 🙂 Serve with this delicious nut bread for a complete meal..

If you would like to receive similar recipes in your inbox, be sure to add your email address to the follow link 🙂

Preparation (the day before)

1.  Soak your chickpeas in hot water for 8 hours or overnight. 

Ingredients:                     

  • 2 x cups chickpeas, still warm, or cold and peeled (see step 1)
  • 1/4 x cup tahini
  • 2 1/2 x fresh lemons, or about 8 tablespoons lemon juice
  • 1-2 cloves of garlic, pasted (bang with mortar and pestle, crushing doesn’t work!)
  • 1 tsp sea salt
  • 1 tsp cumin
  • paprika to serve
  • really good quality extra virgin olive oil to serve (you can go without if you’re dieting)

To prepare:

  1. Rinse the soaked chickpeas, and then pour then into another pot and boil them for around an hour until tender. (Keep the water you boil them in). Set aside 2-3 tab of chickpeas for later.
  2. Pour tahini and lemon juice into your food processor and pulse until creamy and pale in colour. Add salt, and garlic to your lemon-tahini sauce.
  3. Pour chickpeas into a food processor and blend well.  Add as much of the water left over from step 1 as you want to achieve your desired thinness.  Taste and adjust seasonings. 
  4. Let this all run in your food processor for 2-3 minutes until smooth.

Serve drizzled with olive oil, and top with extra chickpeas, paprika or cumin.

hummus2

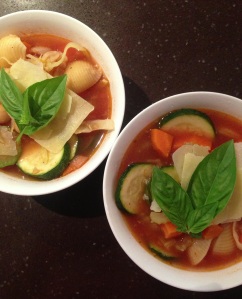
The basics – Easy low calorie Minestrone Soup

Cooking at home, often means making do with what you have got. This is where this recipe comes in. Minestrone Soup is an Italian soup, made using vegetables, pasta and a basic tomato broth it is traditionally a ‘poor person’s recipe’, bringing together a range of ingredients to make a nourishing hearty meal. I have adapted the recipe to create a low-calorie version which doesn’t compromise on nutrients. You can substitute the vegetables and type of pasta, add meat or even noodles. The options are limitless..

If you would like to receive similar recipes in your inbox, be sure to add your email address to the follow link 🙂

Ingredients (Makes 8 servings – portion up whatever you don’t need and freeze for later).

  • 2 litres vegetable stock

    garnish with fresh basil and parmesan cheese

    garnish with fresh basil and parmesan cheese

  • 2 cups water
  • 5 heaped tablespoons of tomato paste
  • 2 x onions chopped
  • 3 x cloves garlic, crushed
  • 3 x celery sticks, sliced
  • 3 x carrots, peeled and diced
  • 3 x zucchinis, sliced (just less than 1cm)
  • 800gm butter beans (2 cans)
  • 2 x cups pasta (I use macaroni, penne or spiral depending on what is in the pantry).
  • 1 x tab
  • Fresh basil and parmesan (to top)
  • Salt and pepper

To prepare:

  1. Prep your vegetables, and crush garlic
  2. Heat oil in a large saucepan on medium heat. Lightly fry the onion and garlic until the onion is clear and translucent (around 7-8 minutes)
  3. Add stock, water, pasta, tomato paste, celery and carrots. Bring to the boil and simmer for 10 minutes.
  4. Add zucchini and butter beans. Cook for a further 5 minutes.
  5. Season with salt and pepper, top with basil and parmesan.

Note: I portion up extra servings and freeze them for later. You can also half the recipe and make less.

soup pot

How to make healthy berry compote!

Berry compote makes everything taste ten times better. It is also super easy and so versatile. I add it to everything – French toast, chia puddings, pancakes, granola, chocolate cake, chocolate pudding, brownies etc…

I’ve included some basic steps below on how to make a healthy version… (note – you can add a tab of caster sugar if you like, I prefer it without!).

Ingredients:

  • 1 cup strawberries, rinsed and hulled

    Add to a chia and granola pudding

    Add to a chia and granola pudding

  • 1/2 cup raspberries
  • 1/2 cup blueberries
  • zest and juice of an orange

To prepare:

  1. Place orange juice, zest (sugar if you are using it) and strawberries in a shallow frying pan. Simmer gently for 2 minutes.
  2. Turn the strawberries over and simmer for 2 minutes.
  3. Add the blueberries, simmer for another minute.
  4. Add the raspberries, toss them through gently. Remove from heat.

Use as a topping or a side. Stores in the fridge for up to 5 days.

Enjoy over yoghurt and fluffy whole meal and ricotta pancakes

Enjoy over yoghurt and fluffy whole meal and ricotta pancakes

poached berries in progress

Salted Chocolate brownies

Ingredients:

  • 10 mejool dates, pitted    Serve with fresh berries
  • ¼ cup cocoa powder
  • 1 x cup walnuts
  • 1 x cup almonds
  • 2 tsp vanilla bean paste
  • 4 tab protein powder
  • 2 tab water
  • 1/2 tsp sea salt

To Prepare:

  1. Combine nuts into a food processor until roughly chopped.
  2. Remove 1/4 of the nut mixture and set aside.
  3. Add the dates, vanilla, protein powder, cocoa and sea salt to the food processer. Process again until combined.
  4. Add the water and blend until it becomes like cookie dough.
  5. Add the nuts that you set aside and mix well
  6.  Press into a small square baking tin lined with grease proof paper.
  7. Refrigerate for 3 hours and then serve 🙂

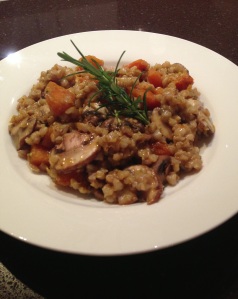
Delicious gluten-free risotto

If you’re like me risotto is one of those foods that is so hearty and comforting when you eat it but then makes you feel so bloated and sick about 20 minutes later. This recipe came about after a lovely lady at work gave me a bag of barley. She uses it to detox and cleanse and has been advised to drink barley water daily. With all the negativity that grains have been receiving lately, we are completely missing the point. Some grains are highly nutritious and do wonders for our body. All grains are definitely not created equal and barley is one of those. It is rich in fibre, unbelievably nutritious and has a yummy nutty flavour. It absorbs almost 5 times it’s size in water making it a great substitute for arborio rice in risotto.

I must warn you, this recipe takes a while. It took me almost an hour and a half although I have learnt to cut a few corners and slow down the cooking time. I have gotten it down to around an hour! Make a whole batch and freeze them into individual portions. It stores really well and is great for work lunches/dinners when you’re craving comfort food but do not want to cook. You can use any vegetable combination that you like. For this one, I have used pumpkin and mushrooms. Asparagus would be a great addition as well.

Ingredients (serves 4)

  • 3/4 cup barley      Deliciously indulgent
  • 1 litre water
  • 500ml vegetable stock
  • coconut/olive oil spray
  • 200gm mushrooms, sliced thinly
  • 300gm pumpkin, cut into small cubes
  • 2 x brown onions, diced
  • 2 x cloves garlic, crushed
  • 1 tsp dried oregano
  • Sea salt and pepper
  • rosemary sprigs (optional, to garnish)

To Prepare:

  1. Combine the water and stock in a medium saucepan, bring to the boil, reduce heat and let it simmer covered.
  2. Spray a separate medium saucepan with olive oil spray, heat on medium.
  3. Add garlic and mushroom and cook until the onion softens.
  4. Stir in barley, add 1 cup of the stock, bring to the boil, reduce heat and simmer until the stock is absorbed.
  5. Keep adding 1/2 cup of stock at a time, until liquid is absorbed.
  6. While your barley is cooking, prepare your vegetables.
  7. Heat a fry pan sprayed with oil on medium, cook pumpkin until tender (about 5-6 minutes).
  8. Add a generous amount of sea salt and pepper, the oregano, mushrooms and cook until tender. Set vegetables aside in a bowl (this will stop the cooking process and prevent them from going mushy).
  9. Once the barley has absorbed all of the stock (about 50 minutes), add the vegetables and heat through.

Creamy bircher muesli

top with banana mint and coconut

This muesli is inspired by a recent holiday in Hawaii. We stayed at the beautiful Moana surfrider and apart from amazing ocean front views and the most hospitable staff on the planet, the breakfast was delicious. Amongst the array of delicious fruits on offer, they had the creamiest bircher muesli I had ever tasted. Whereas bircher muesli is usually made by soaking rolled oats in apple or orange juice, I have tried to model their bircher to the best I can. It took a couple of tries, but I think I have something similar.

I love bircher muesli for its simplicity and decadence. Prep it the night before and then add your favourite toppings the next morning. I’ve kept it in my fridge for 3 days, but you will need to make sure it is sealed really well and you give it a good mix before serving.

If you would like to receive similar recipes in your inbox, be sure to add your email address to the follow link 🙂

Ingredients (makes enough for 3 servings)   food prep

  • 1 cup rolled oats
  • 1 1/2 cups your choice of milk
  • 1/2 cup fresh raspberries
  • 3 tab honey
  • 1 tsp vanilla
  • 2 tab cacao nibs
  • 2 tab chia seeds

To prepare:oranges and apples

  1. Mash raspberries using a fork in a small air-proof container.
  2. Add all of your ingredients to raspberries and ensure honey is mixed through evenly. Seal and soak overnight.
  3. Garnish with your choice of topping the next day. I just add whatever fruit I have in the kitchen. 🙂

The creamiest carrot, sweet potato + coconut soup

This is the first soup recipe I have ever created and it is freaking delicious. I kid you not. I was in absolute heaven when I had my first taste and immensely proud of myself. I honestly can’t believe how little calories there are in this recipe. I’ve calculated approximately 250 per massive bowl.

This is a basic soup recipe which uses coconut water in addition to stock. Coconut water adds a sweet nutty texture to this soup and increases the levels of potassium and is super hydrating. This recipe freezes really well. Make a whole batch, separate it into individual servings and freeze for when you want a delicious comforting dinner. I had mine with a toasted slice of my delicious nutty flour-free bread. Addictive.

Ingredients (Makes 4 massive servings)       photo-18photo-19

  • 500gm carrots, peeled and chopped
  • 500gm sweet potato, peeled and chopped
  • 2 brown onion, diced
  • 2 tab ginger, grated
  • 750ml vegetable stock
  • 500ml coconut water
  • 1 lime, juiced
  • 1 tab coconut oil
  • 1 tsp curry powder
  • 1 1/2 tsp pepper
  • 1 tsp sea salt

To serve:

  • fresh basil, torn
  • fresh chilli, sliced


To Prepare:

  1. Heat oil in a saucepan over medium heat. Add carrots, sweet potato, and onion. Cover and cook, stirring occasionally, until vegetables soften and brown slightly, about 15 minutes.
  2. Add ginger, stir, and cook 1 minute.
  3. Add chicken stock, bring to a boil, partially cover, then reduce to a simmer for 10 minutes, or until vegetables are soft.
  4. Using a stick blender, puree until smooth.
  5. Add coconut water and blend to combine. Add lime juice, seasoning and curry powder. Stir, then heat through.
  6. Garnish with chilli and fresh basil. Yum.

Deliciously nutty, flour-free, gluten free bread.

I first learnt about psyllium husk after hearing the phenomenal Julie Meek speak. Julie is a dietician, sports nutritionist and author of Truth, Lies and Chocolate. Before chia was a hipster’s dream, Julie was advocating its benefits. She also spoke about the power of psyllium husk, its power to cleanse your system and regulate the most irregular of people. From that day on, I was incorporating both chia and psyllium husk into my daily diet. I would have 2 spoonfuls of chia every morning with breakfast and when feeling bloated or gluggy, 2 tablespoons of psyllium husk in the evening.

Psyllium husk is fantastic for your intestinal health. It contains a spongy fiber that soaks up a significant amount of water and improves digestion. In food it is pretty much tasteless, making it a fantastic binding agent for this bread. You can add it to your smoothies, cereals, recipes  or just suck it up; swallow it whole and down it with water. It is completely up to you.

I can not claim credit for this recipe, nor the technique used. I have adapted this from mynewroots life changing bread. I’ve  used the ingredients that I had in my cupboard and played around with ratios. The result was a delicious crunchy bread which is ah-ma-zing with soup and loved by everyone in the office. It is honestly so hard to believe this is healthy and flour free. You don’t get that yukky bloated feeling you normally feel after having bread and you can have it as toast in the mornings or to beef up your soups/salads at lunch.

Please note. You will need to prep this the day before and allow it to sit overnight for the psyllium husks to absorb the moisture and bind together the ingredients. This will keep it from falling apart and crumbling.

Ingredients:        photo-20

  • 1 ½ cups rolled oats
  • 1x cup  mixed seeds (sunflowers and pepitas)
  • 1/4 x cup slivered almonds
  • ½ x cup hazelnuts
  • 4 x tab psyllium seed husks (available in the health section at most supermarkets).
  • 3 x tab chia seeds.
  • 2 x tab maple syrup
  • 3 x tab macadamia oil, melted (you can use coconut oil if you prefer)
  • 1 3/4 x cup water


To Prepare: 

photo-22

  1. Prepare your bread pan. Spray it with coconut oil spray and line with baking paper.
  2. Combine all of the dry ingredients and pour them into the pan.
  3. With a fork, whisk together maple syrup, oil and water. Add it to the dry ingredients and make sure everything is soaked and the dough is really thick.
  4. Run a knife over the top to flatten. Wrap your pan in a tea towel and leave it out in room temperature overnight.

The next day:

  1. Preheat oven to 175°C.
  2. Bake the loaf for 20min in the pan.
  3. Remove bread from loaf pan, place it upside down directly on the rack and bake for another 40 minutes.
  4. Tap the bread and remove once it sounds hollow.
  5. Allow it to cool completely (otherwise it will fall apart when slicing).
  6. Hold it together firmly and slice it up. You can glad wrap individual servings and freeze for later or store in an airtight container for 3-4 days. Yum, Yum.

Crunchy thai chicken salad

I think it is pretty clear I love asian food. All you need to do is browse throughout my recipe collection to see how many are influenced by the tastes of Asia and fresh Asian ingredients. The prime reason for my obsession is the crispness of the flavours and just how easy it is to adapt the recipes into delicious and healthy meals.

I go on and on and on about balance in cooking, but it is just so important. I have ruined many a meal by getting the ingredient ratios wrong.  The ratios in this salad are really simple and will ensure you have the perfect sweety, salty, tang.

This salad uses wombok as its main ingredient. I use wombok a lot as a substitute for cabbage. Although they are very similar, wombok is much milder than cabbage so absorbs flavours quite readily. You can usually find wombok at your local supermarket but if not, check out your local chinese grocers.

You can make this salad as a side for bbqs or a complete meal with chicken. To save time, I usually shred the whole cabbage and use half of it to make my snapper, shiitake mushroom and wombok stir fry  and the other half for a salad later in the week.

Ingredients (Serves 2)             Delicious thai crunch salad

  • 300gm chicken breast
  • 1 tab lime juice
  • 1 clove garlic, crushed
  • 250gm wombok, shredded
  • 200gm cherry tomatos, cut in half
  • 1 small red capsicum, cut into strips
  • 1/2 cup torn mint leaves

Salad dressing:

  • 1/4 cup lime juice
  • 2 teaspoons brown sugar
  • 2 teaspoons fish sauce
  • 1 long red chilli, finely chopped

To prepare:

  1. Combine the chicken, 1 tab lime juice and crushed garlic in a bowl. Mix well. Season with pepper.
  2. Spray a pan with olive oil, heat on medium. Cook the chicken on medium heat for 4 minutes each side. Make sure it is well cooked.
  3.  While the chicken is cooking, whisk together the salad ingredients with a fork.
  4. Once chicken is cooked, allow to rest for 5 minutes, slice into strips.
  5. Combine salad ingredients together, drizzle with dressing. Delish 🙂

Creamy Banana, Fig and Almond Smoothie

I love smoothies. It reminds me of when I would go to my local cafe and order a milkshake, thinking I am grown up and sophisticated like the teenagers on Saved by the Bell or Beverly Hills 90210. Smoothies are the better for you- adult version of a milkshake. Whipping up a creamy and delicious smoothie with nutritious ingredients is the ultimate healthy breakfast-on-the-go.

I have been trying to incorporate almond milk into my diet and even though I have not been able to make the switch and use it in my coffee, it works really well in smoothies. I’ve used fresh figs because I have an abundance of them in the later stages of Summer (we have a tree, well my neighbours do but it hangs over our fence so we can kind-of claim ownership), but you can use dried figs instead!

Ingredients: (Makes 1 large or 2 smaller servings)  Top with crunchy muesli

  • 1 cup almond milk
  • 1/2 cup naturally sweet greek yoghurt
  • 3-4 large figs, roughly chopped
  • 2 teaspoons LSA mix (linseeds, sunflower seeds and almond meal)
  • 2 teaspoons chia seeds
  • 1 small, ripe banana
  • Dash of vanilla essence
  • 1 tab granola or muesli to top (optional)

To Prepare:

  1. Blend all of your ingredients together.
  2. Top with muesli. Easy Peasy.